Forum
Foro
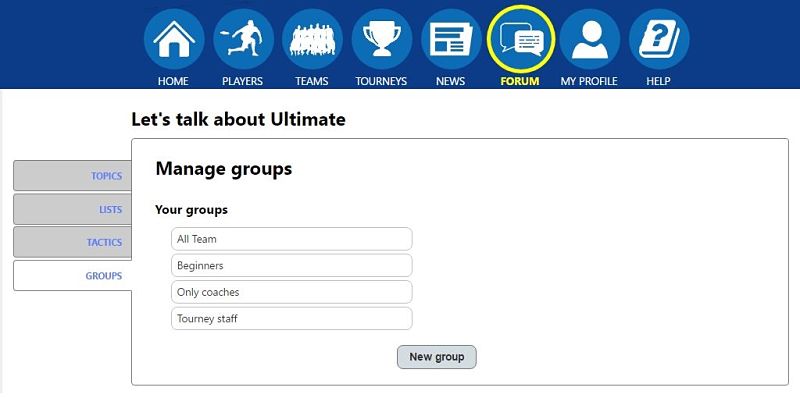
All the Forum functions are based in groups to share activity with their members. So, first of all you have to create as many groups as you want to organize your friends.
Todas la funciones del Foro están basadas en grupos para compartir la actividad con sus miembros. Por ello, lo primero es crear tantos grupos como quieras para organizar tus amigos.
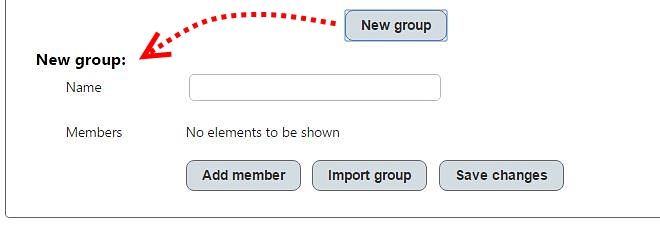
ADD A NEW GROUP
At the bottom of the group list you find the "New group" button that opens the options to insert a new group:
AÑADIR UN NUEVO GRUPO
Al final de la lista de grupos encontrarás el botón "Nuevo Grupo" que abre el panel con las opciones para crear un nuevo grupo:
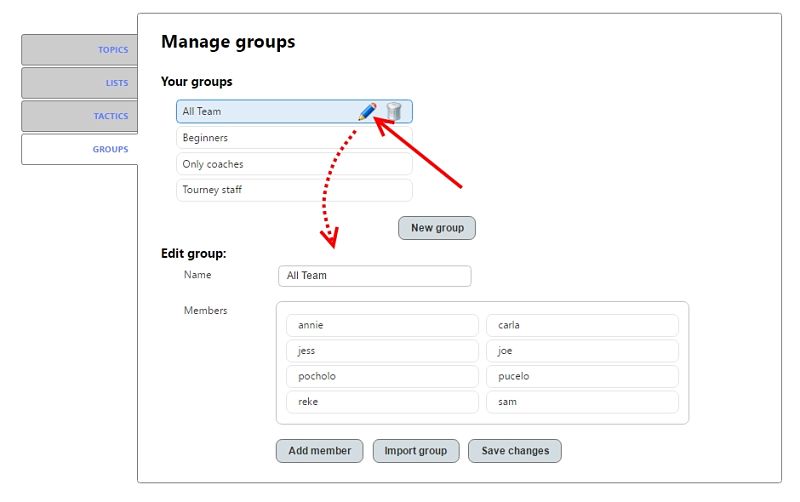
EDIT A GROUP
When you put the cursor over a gruop you find the edit icon that will show the group's name and its members to edit them.
EDITAR UN GRUPO
Cuando pasas el cursor por encima de un grupo verás el icono de edición que al pulsarlo, mostrará el nombre del grupo y sus miembros para editarlos.
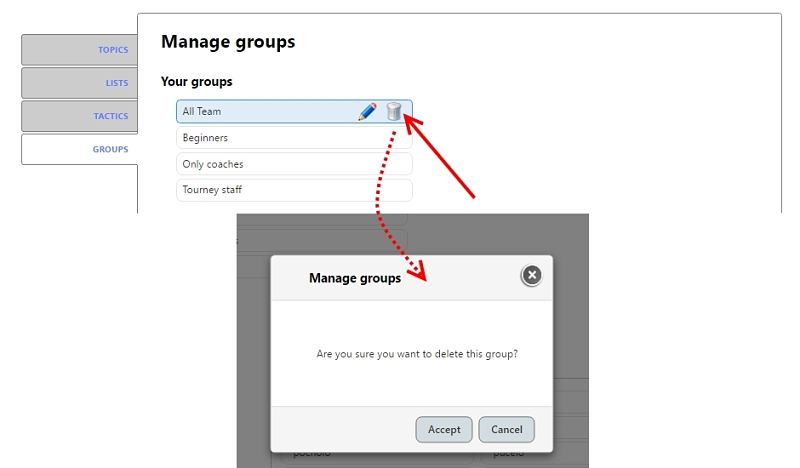
DELETE GROUP
The same way you find the edit icon, you can see the icon to delete a group. If you click on it, a popup appears to ask you for confirmation.
BORRAR UN GRUPO
De la misma manera que encuentras el icono de editar, verás a su lado el icono para eliminar. Si pulsas sobre él, se muestra un mensaje de confirmación para evitar un borrado accidental.
ADD A NEW MEMBER TO A GROUP
AÑADIR UN MIEMBRO NUEVO AL GRUPO
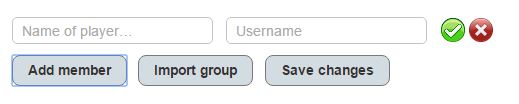
First you have to edit a group and then you could add new members. You can add members in these two ways:
Primero tienes que editar un grupo y luego ya puedes añadir nuevos miembros. Puedes añadir miembros de estas dos formas:
1 - Adding members one by one: just click on "Add member" and find the member seraching by username or player name.
1 - Añadir miembros uno a uno: simplemente pulsa en "Añadir miembro" y encontrar el miembro buscando por nombre del jugador o nombre de usuario.
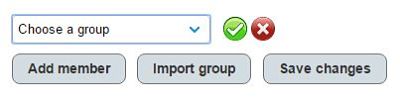
 2.- Importing a whole previous group: After made click on the "Import group" you will see a list with your current groups. Select one of them
and "Ok" to insert all the members of the selected group in the current one. Take in consideration that members will not be duplicated.
2.- Importando un grupo existente: Después de pulsar en el botón "Importar grupo" verás una lista con tus grupos actuales. Selecciona uno de ellos
y "Ok" para insertar todos los miembros del grupo existente en el actual. Ten en cuenta que los miembros no se duplicarán.
2.- Importing a whole previous group: After made click on the "Import group" you will see a list with your current groups. Select one of them
and "Ok" to insert all the members of the selected group in the current one. Take in consideration that members will not be duplicated.
2.- Importando un grupo existente: Después de pulsar en el botón "Importar grupo" verás una lista con tus grupos actuales. Selecciona uno de ellos
y "Ok" para insertar todos los miembros del grupo existente en el actual. Ten en cuenta que los miembros no se duplicarán.
 Repeat points 1 or 2 as many times as you need and then, don't forget to "Save" the changes.
Repite los puntos 1 y 2 tantas veces como necesites y luego, no olvides guardar los cambios.
Repeat points 1 or 2 as many times as you need and then, don't forget to "Save" the changes.
Repite los puntos 1 y 2 tantas veces como necesites y luego, no olvides guardar los cambios.
DELETE A MEMBER FROM A GROUP
In the list of members, when you place the cursor over an item, you have the option to delete it.
Prior to real remove, you will be asked for confirmation.
ELIMINAR UN MIEMBRO DE UN GRUPO
En la lista de miembros, cuando colocas el cursor sobre uno de ellos, tienes la posibilidad de borrarlo.
Antes de su eliminación definitiva, se pide tu confirmación.

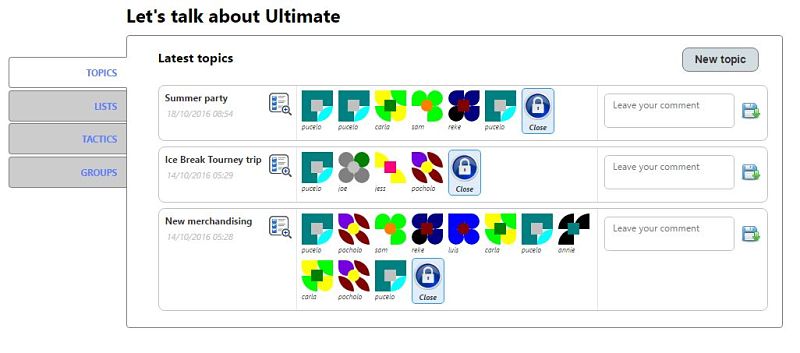
To organize all your discussions or ultimate's chatters in a simple view, you can create a new Topic and asign it to one of your groups. Automaticalliy all the groups members would be ready to partipate on the topic.
Para organizar todos tus debates o charlas sobre ultimate de un vistazo, puedes crear un nuevo Tema y asignarlo a uno de tus grupos. Automáticamente todos los miembros estarán listos para participar en dicho tema.
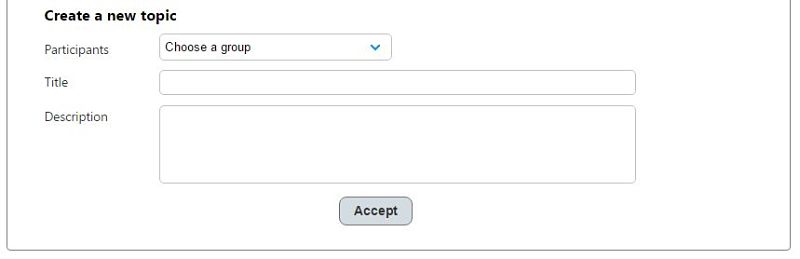
ADD NEW TOPIC
To create a topic, find the button in the top right of the page and you will be redirect to the form. Fill all the data:
select one of your groups, provide a title and a detailed description. Then save the topic and all the members could start to participate.
AÑADIR NUEVO TEMA
Para crear un tema, encuentra el botón en la parte superior derecha de la página y serás dirigido al formulario. Rellena todos los datos:
elige uno de tus grupos, proporciona un título y una descripción detallada. Finalmente guarda el tema y desde ese momento los miembros podrán participar.
LEAVE COMMENT
Insert your comment in the text box on the right side of the topic and then save it. All the members in the group will see your
avatar in the chronologic time line.
DEJAR UN COMENTARIO
Introduce tu comentario en la caja de texto a la derecha del tema y guárdalo. Todos los miembros del grupo verán tu
avatar en la línea temporal cronológica.

READ COMMENT(S)
To read a comment, just click on the related avatar.
LEER COMNETARIO(S)
Para leer un comentario, simplemente pulsa sobre el avatar correspondiente.

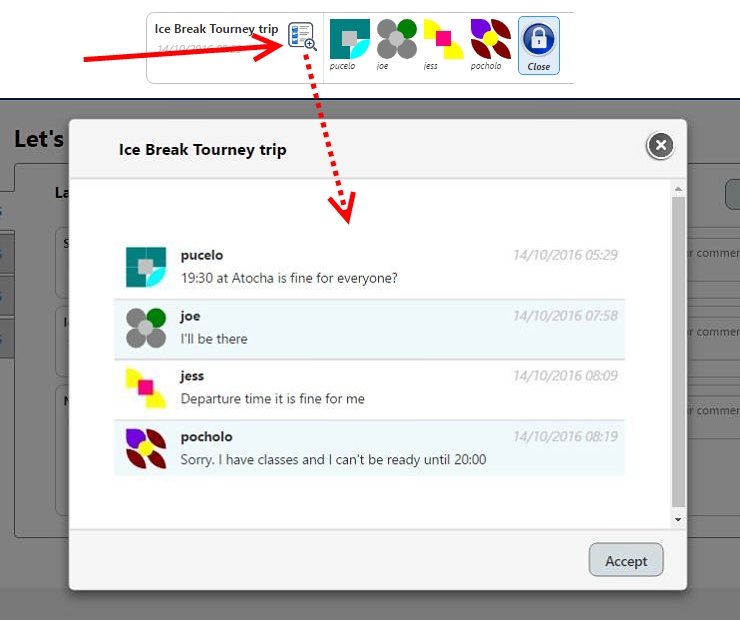
On the other hand, if you want to see all the topic's history summarized, click on the icon located beside the topic title:
Por otro lado, si quieres ver todo el historial del tema resumido, pulsa sobre el icono situado junto al título de tema:
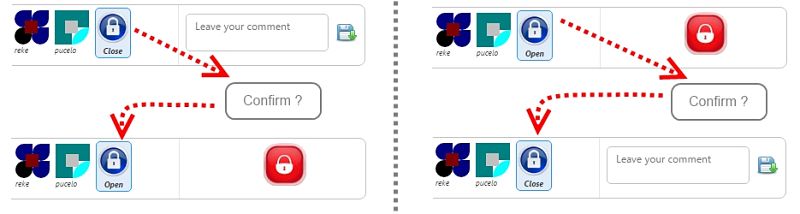
OPEN/CLOSE TOPICS
The user who created the topic is the responsible to close or reopen it as many times as needs. The last icon
of the time line (the only one that isn't an avatar), allows you to open/close the topic. Whenever the status changes, a popup will be shown
to require confirmation.
ABRIR/CERRAR TEMA
El usuario que creó el tema es el encargado de dar por cerrado o reabrirlo las veces que sea necesario. El último icono
en la línea temporal (el único que no es un avatar), permite abrir/cerrar el tema. Cada vez que se produce un cambio, se solicitará confirmación.
To collect different opinions or vote on a matter related to your team, you can create a new List and asign it to one of your groups. Automaticalliy all the groups members would be ready to partipate on the list.
Para recoger diferentes opiniones o votar sobre algún tema referente a tu equipo, puedes crear una nueva Lista y asignarla a uno de tus grupos. Automáticamente todos los miembros estarán listos para participar en dicha lista.
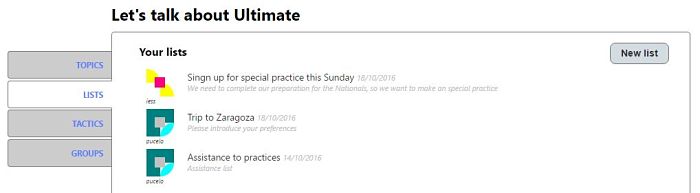
ADD NEW LIST
To create a list, find the button in the top right of the page and you will be redirect to the form. Fill all the data:
select one of your groups, provide a title and a detailed description. Choose also how do you want the members interact with the list:
- Only you can view and edit: exclusive list for your private use.
- Members can view but not edit: You manage the information, meanwhile the members can see the data.
- The participants can view and edit: Each member are allowed to manage its own info, but you can insert or edit it.
Then save the list and all the members could start to particpate.
AÑADIR NUEVA LISTA
Para crear una lista, busca el botón situado en la parte superior derecha de la página y serás redireccionado al formulario.
Completa todos los datos: selecciona uno de tus grupos, proporciona un título y una detallada descripción. Elige también como quieres que los miembros actúen en la lista:
- Sólo tu puedes ver y editar: una lista para tu uso privado y exclusivo.
- Los miembros pueden ver pero no editar: Tú manejas la información y el resto puede consultarla.
- Los participantes pueden ver y editar: Cada miembro puede editar su propia información, pero igualmente tú puedes corregirla.
Finalmente guarda la lista para que los miembros puedan empezar a participar.
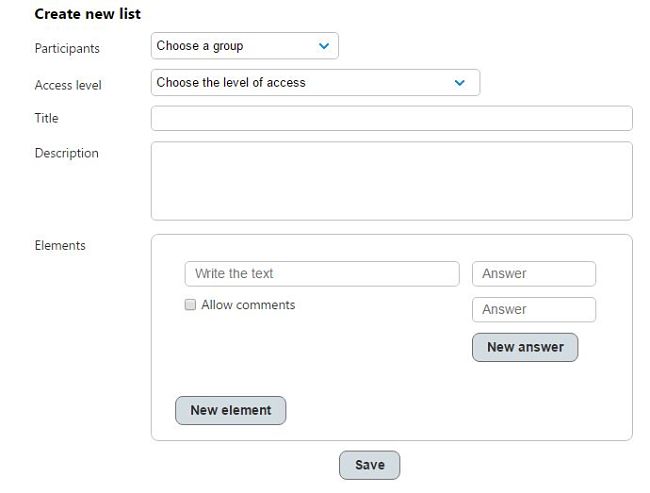
MANAGE LIST ELEMENTS
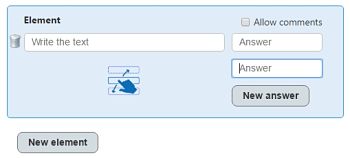
One list can support as many elements as you need (you can add new elements using the "New element" button).
Each item need a text for descript it and at least two possible options for answering (if you want to give more than two options just add
answers using the related button). Also you can enable/disable adding extra comments to the option choosen.
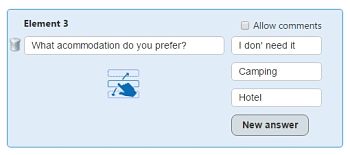
Each element or answer can be deleted clicking on the trash icon displayed when the cursor hover the item, and edit it.
You can sort the elements by drag&drop.
Once you finish all the changes, don't forget to save them.
GESTIONAR LOS ELEMENTOS DE LA LISTA
Una lista puede soportar tantos elementos como necesites (puedes crear nuevos elementos usando el botón "Nuevo elemento").
Cada elemento necesita un texto descriptivo y al menos dos posibles respuestas (si quieres proporcionar más de dos opciones tan sólo has de usar el botón para ello).
También puedes activar/desactivar la posibilidad de añadir comentarios a la opción elegida.
Cada elemento o respuesta puede ser eliminado pulsando en el icono de la papelera que aparecerá al pasar el cursor sobre el elemento. Igualmente puedes editarlo.
Los diferentes elementos se pueden ordenar arrastrándolos al lugar que desees.
Cuando hayas termiando de hacer cambios, no olvides guardarlos.
DELETE OR EDIT LISTS
To remove or edit an existing list, hover it and click on the desired action. Confirm the deletion or save the changes.
BORRA O EDITA LISTAS
Pasa eliminar o editar una lista, utiliza los iconos mostrados al pasar el cursor por ella. Confirma el borrado o guarda los cambios.

LIST SUMMARY
Just click on a list to see its details. Then a popup will show all the elements and the options currently selected by
each participant. If you have the correct rights, you could edit any value, but if not, only will be able to set yours.
RESUMEN DE LA LISTA
Tan sólo pulsa en una lista para ver sus detalles. Una ventana mostrará todos los elementos y el estado de las respuestas
de cada participante. Si tienes los derechos adecuados, puedes editar cada valor, pero sino, tan sólo podrás modificar los tuyos.
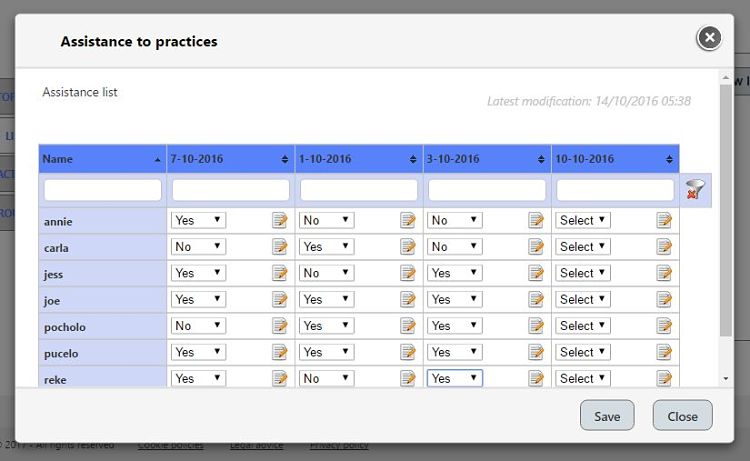
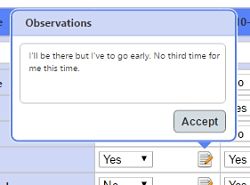
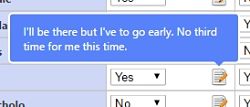
When the commentaries are avaiable in the column, you can insert/edit notes clicking on the notebook icon.
Cuando los comentarios están disponibles en la columna, puedes insertar/editar las notas pulsando en el icono del cuaderno.
FILTERING AND SORTING DETAILS LIST VIEW
As may there are a lot of members, options and elements than make hard to summarize the data
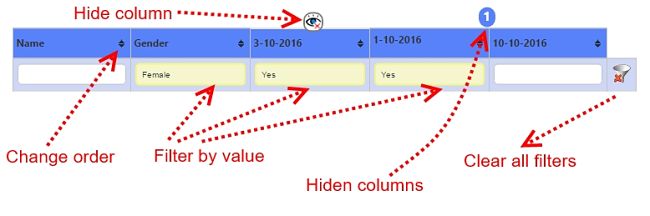
in the details view, is possible to filter and reorder the table. Just above each column header, you'll find an input textbox where you can insert
a criteria to filter the rows with that value.
Column order can be switch between ascending/descending clicking on the column header. To multiple column ordering, just hold key CAPS and then click on the header.
To reorder columns, just drag the column to the left or right to the new position.
You can hide a column using the eye icon visible when the cursor is over a column. To show again a hidden column, click on the mark between the
adyacent header column.
To remove the filters and see all the data again, press the "Clear filter" button located at the top rigth of the last column.
Here you are a summary with all the filter options:
FILTRAR Y ORDENAR LA VISTA DE DETALLE DE LA LISTA
Ya que puede haber una gran cantidad de miembros, opciones y elementos se puede hacer
difícil resumir los datos en la vista de detalles, es posible filtrar o reordenar la tabla. Justo encima de cada columna, encontrarás un lugar para insertar el texto para
filtrar las filas por ese valor.
El orden de las columnas puede cambiar entre ascendente/descendente pulsando en la cabecera de cada columna. Para un ordenado por múltiples columnas, tienes que mantener pulsada
la tecla MAYÚSCULAS y luego pulsar en la cabecera de otra columna.
Para reubicar una columna, tan sólo arrástrala a la izquierda o derecha.
Puedes ocultar una columna completamente pulsando sobre el icono del ojo que aparece al pasar el cursor. Para ver de nuevo una columna oculta, pulsa sobre la marca
entre ambas columnas junto a las cabeceras.
Para eliminar los filtros y ver de nuevo todos los datos, utiliza el botón "Quitar filtros" situado en la parte derecha superior de la última columna.
Aquí tienes un resumen con todas las opciones de filtrado:
ADD A NEW TACTIC
When you are logged in a PC (at mobile devices you can't create/edit tactics) you could see the "New tactic" button on the
top right of the tab "Tactics" in the "Forum section.
Select one of your previously created groups wich members you want to share the tactic/drill, give a title and select the kind of surface
the play is designed for.
AÑDIR UNA NUEVA TÁCTICA
Cuando estás logueado en un PC (desde un dispositivo móvil no se pueden crear/editar tácticas)
pudes ver el botón "Nueva táctica" en la parte superior derecha de la pestaña "Tácticas" en la sección "Foro" del menú principal.
Elige uno de tus grupos creados previamente con los miembros que quieres compartir la táctica/ejercicio, dale un título y elige la superficie para la que has
diseñado la jugada.
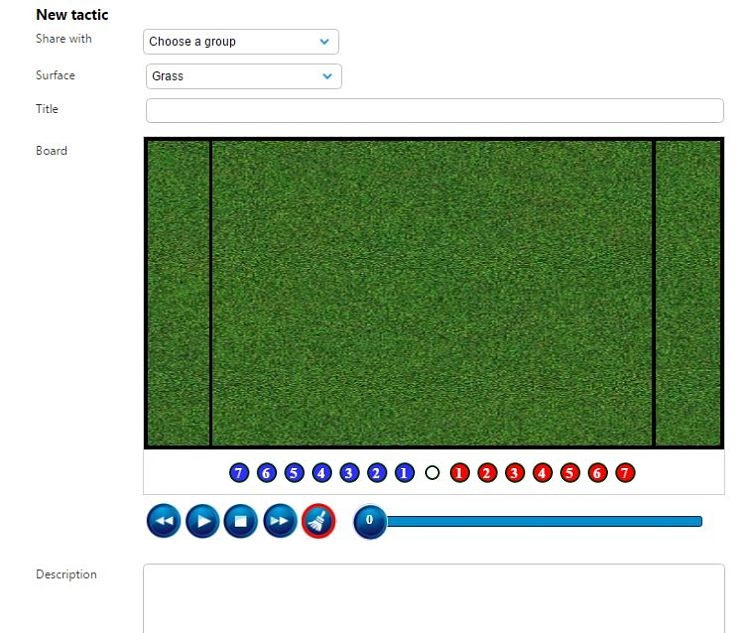
Drag&drop all the players you need to their initial position at the field in the play.
Arrastra al campo todos los jugadores que necesites a su posicion inicial en la jugada.
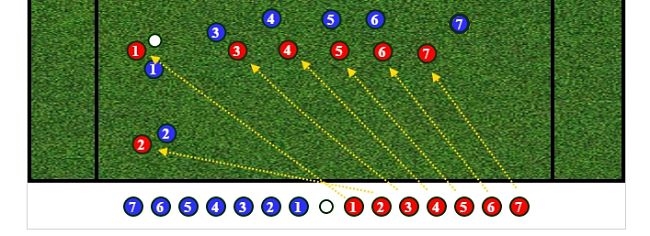
Select each one of them who be part of the play and draw their paths clicking in the field to add new control points.
Selecciona cada uno de los que participan en la jugada y dibuja su recorrido haciendo click en cualquier parte del campo para añadir puntos de control.

The following items are draggable so you can relocate them as many times you want.
Los siguientes elementos son selecionables y se pueden volver a posicionar las veces que sea necesario.

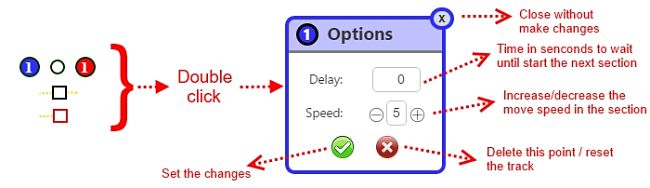
On all control points is possible to add a delay to sincronize the section time and the speed of a player with others moves involved. To open the popup with all the options just double click on a control point.
En todos los puntos de control es posible añadir retardos para sincronizar el tiempo y la velocidad de cada jugador con el resto de movimientos involucrados. Para abrir el popup con todas las opciones tan sólo tienes que hacer doble click en un punto de control.
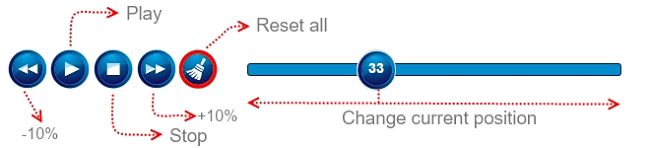
PLAY A TACTIC
Once the play is finished or meanwhile you are creating it, you can watch the result using the typical media player controls.
REPRODUCIR UNA TÁCTICA
Una vez la jugada está terminada o mientras la estás creando, puedes previsualizar el resultado con los típicos controles de un reproductor.
EDIT OR DELETE A TACTIC
Hover one item in the tactic list, you will see the edit and delete icon only if you are the user who created it.
To edit, just follow the steps you did when you created it, make the changes and don't forget to save it.
If you don't need a tactic anymore, you can delete it and it will disappear from the list of all the members in the group too.
EDITAR O BORRAR UNA TÁCTICA
Pasa por encima de cualquier táctica del listado y verás los iconos para la edición y borrado si es que tú fuiste quien lo creó.
Para editar, tan sólo sigue las mismas instrucciones que usaste para crearlo, realiza los cambios, y por supuesto, no olvides guardar los cambios.
Si ya no necesitas más alguna de las tácticas, puedes borrarla para que desaparezca del listado y el resto de miembros del grupo dejarán de tener acceso a ella también.
